Benvenuto Visitatore ( Log In | Registrati )
 .: GBArl.it :. News sulle Console Nintendo - Emulazione - Flash Cards - Trainer > GUIDE > Guide Nintendo DS
Seguici su:


 Wednesday 8 November 2006 - 19:37 Wednesday 8 November 2006 - 19:37
Messaggio
#1
|
|
 Utente GBARL Gruppo: Membri Messaggi: 69 Iscritto il: Wed 23 November 2005 - 09:32 Da: Venaria (TO) Utente Nr.: 8.943 Feedback: 0 (0%) |
Dslinux miniguida
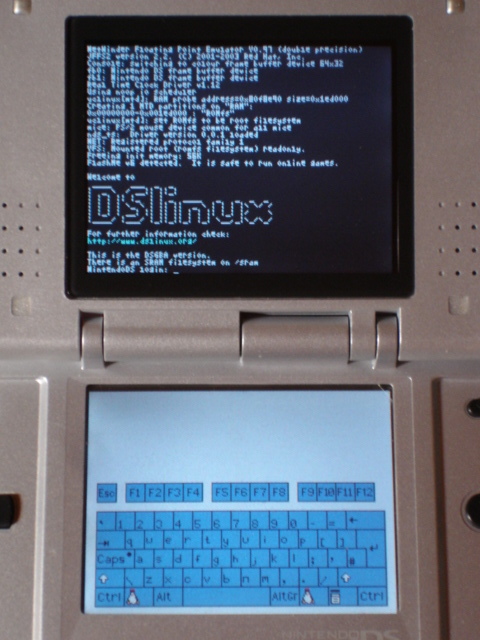 Dslinux è il port di linux per la consolle Nintendo, la documentazione è disponibile qui http://www.dslinux.org/wiki/index.php Requisiti: -DsLinux Nintendo/RAM Version 3.2.0 -Router/wifi usb/nintendo wfc (richiede driver modificati) nel mio casi un router Sitecom WL-118 -Flashcard (Supercard SD) stessa cosa per M3 -Browser: Links o Retawq (non occorre scaricare nulla) Il file da scaricare si trova al sito www.dslinux.org nella sezione download la distribuzione e per supercard dslinux-ram.tgz qui http://kineox.free.fr/DS/dslinux-ram.tgz una volta scaricata scompattate con winrar (il file si chiama dslinux-ram senza estensione aggoingete .zip e riaprite con winrar fino ad ottenere una directory Linux e il file dslinux.nds copiate il tutto sulla vostra memoria sd e la prima parte è fatta. Testa il tutto lanciando dal menu della supercard il file Dslinux.nds otterra una schermata (quella classica di linux all'avvio) alla fine della quale otterrai il prompt di linux à, per spegnere correttamente devi lanciare il seguente comando poweroff e dare invio. Configurazione Dopo il prompt digitare quanto segue cd /etc/ cp rc.defaults rc.conf ora potremo editare il file rc.conf con le nostre preferenze (Nota:non editare il file con windows) per fare ciò vi avvaremo di un editor di nome nano nano /etc/rc.conf qui ci troveremo ad inserire i nostri dati in questo esempio: sid=GBARL canale=11 wepkey=CHIAVE SEGRETA ip=192.168.0.123 gateway=192.168.0.1 eccovi una copia del file : ################################################################ # # INSTRUCTIONS # # You have to make a copy of this file so you can edit it. # # If you are using the RAM or the RAM-DEVEL build, # run this command to create the copy: # cp /etc/rc.defaults /media/linux/etc/rc.conf # # If you are using the GBAMP or the GBAMP-EXT2 build, # run this command to create the copy: # cp /etc/rc.defaults /gbamp/linux/etc/rc.conf # # If you are using the M3 CF build, # run this command to create the copy: # cp /etc/rc.defaults /m3/linux/etc/rc.conf # # If you are using the SUPERCARD CF or the SUPERCARD SD # build, run this command to create the copy: # cp /etc/rc.defaults /supercard/linux/etc/rc.conf # # If you are using the DSMEM build, # run this command to create the copy: # cp /etc/rc.defaults /sd/linux/etc/rc.conf # # If you are using the NDS version of DSLinux, # run this command to create the copy: # cp /etc/rc.defaults /var/rc.conf # NOTE THAT /var/rc.conf WILL NOT BE PRESERVED ACROSS # REBOOTS ON THE NDS BUILD! # # If you are using the .ds.gba version of DSLinux, # run this command to create the copy: # cp /etc/rc.defaults /sram/rc.conf. # The /sram filesystem needs to be initialised before # it can be used. # See http://www.dslinux.org/wiki/Running_DSLinux # for more information. # # Then edit the copy with vi. # If you have never used vi before, see: # http://www.dslinux.org/wiki/Vi # There is an introduction to vi on that page. # ################################################################ # This file provides default flags for the DSLinux boot process. # The flags defined in this file can be either set or empty. # If a flag is empty, it will not affect the system. # This sets the hostname. You can set this to whatever you want. hostname="NintendoDS" # By default, wireless networking is not started on boot. # If you want to enable it at boot time, set this flag to "YES". enable_network_on_boot="NO" # You can start networking anytime by running: # /etc/rc.d/network start # and stop it anytime by running: # /etc/rc.d/network stop # DSLinux can use network settings from your Nintendo WiFi # Connection (WFC) profiles. If you want to use this feature, # set wfc_config to the number of the profile you want to use, # either 1, 2 or 3. You don't have to configure anything else # if you use WFC settings. # If you don't want to use WFC settings, leave wfc_config # empty and configure your network below instead. wfc_config="" # Set the essid of your wireless router here. # For example: # essid="MyEssid" # You cannot use wireless networking without setting an essid. # Note that DSLinux only works in managed mode, i.e. with # an access point. Ad-hoc mode is not supported. essid="GBARL" # If DSLinux fails to associate with your access point, # try setting you access point's channel here. # For example: # channel="11" channel="11" # Here you can set a wepkey. Both 64bit and 128bit keys are # supported. For hex keys, just enter the key without prefix: # wepkey="9923829ea8923" # For ascii keys, make sure you use an 's:' prefix: # wepkey="s:mysecretkey" # If you do not want to use WEP, just leave this flag empty. wepkey="CHIAVE SEGRETA" # You can assign a static IP and gateway. If you leave IP # empty, automatic configuration via DHCP is used instead. # # For example: # ip="192.168.1.42" # gateway="192.168.1.1" ip="192.168.0.123" gateway="192.168.0.1" # If you are not using DHCP, you can supply a # netmask and a broadcast address, if you want to. netmask="" broadcast="" # You can specify up to 2 DNS servers if you don't use DHCP. dns1="" dns2="" # If you want to start telnetd on boot, so you can login into # your DS from your PC via telnet, set start_telnetd to "YES". # Note that you should only start the telnet server in a # trusted environment. Do not enable it if you are in a # public network, because anyone could easily connect to # your DSLinux installation (the default root password # is widely known). Neither should you configure your router # to put the DS into DMZ, because this makes your DS accessible # to anyone on the internet! start_telnetd="NO" # If you want to see your DS firmware version on boot, # set this to "YES". By default, the firmware version is shown. show_firmware_version="YES" # start_nanox="NO" # End of file. Quando avrete fatto termiante il programma premendo CTRL+X il prgramma mi chiederà di salvare voi risponderete Y e dopo date invio per accettare il nome del file. Uscite con poweroff ed il gioco è fatto. Ora al riavvio potete usare il porgramma links o retawq. I due browser Links http://links.twibright.com/ Sotto dslinux usare links e come un ritorno al passato quando cioè si navigava in emulazione di terminale. A lancio del programma premere ESC e una volta lanciato il menu tutto può essere configurato dal colore alla pagina da visitare salvare i settaggi e riavviare il programma perchè abbiano effetto. Retawq http://retawq.sourceforge.net Molto simile a tutti i text-browser (vedi Lynx) questo browser i cui comandi possono essere reperiti qui http://www.dslinux.org/wiki/Retawq Comandi base m - menu S - salva sessione corrente M - riprendere sessione salvata Q - uscire da retawq esc - cancellare comando Commandi for navigazione g - va all' url G - edita il seguente url Pulsante direzionale sinistro - indietro Pulsante direzionale destro - avanti Pulsante direzionale sopra - va al precedente link Pulsante direzionale sotto - va al prossimo link Invio o o - apreun link o attiva una form di un elemento (esmpio: scrivere in un campo di testo) O - apre il link in una nuova finestra Ctrl-o - Come il precedente ma divide in due lo schermo r - ricarica la pagina corrente R - forza (bypassa la cache) il caricamento, or retry failed url . (dot) - Ferma D - scarica dal corrente link Ctrl-d - scarica da un link specificato dall'utente H - forza linterpretazione della pagina in html (esempio: nel caso la pagina non temini con .htm or .html) Comandi per il trattamento delle finestre n - nuova finestra N - apre la pagina corrente in una nuova finestra C - chiude la finestra 1 (uno, non L minuscola) - unisce lo schemo precedentemente diviso 2 - divide lo schemo Tab - passa da una finestra alla successiva w o W - prossima finestra Ctrl-w - lista di tutte le finestre Y-Pulsante/spazio - pagina giu X-Pulsante - pagina su l (L minuscola, non 1) - scrolla in su L - scrolla in giu Comandi informativi / - cerca nella pagina corrente, indietro (non differenzia tra minuscole e maiuscole) ? - cerca nella pagina corrente, avanti (not case sensitive) \ - mostra sorgente (use D-pad left to get back to normal view) i - mostra link o informazione sulle form I - mostra la visione d'insieme della pagina web/form/infromazione sull'imagine in una nuova finestra u - Cronologia Configurazione di retawq Per configurare il vostro browser e quindi avere home e preferiti e salti predefiniti fate quanto segue, al prompt di dslinux createvi una directory con questo nome: mkdir .retawq nano .retawq/config copiatevi questo file: #Riga di commento bookmarks local:/home/bookmarks.html #then create bookmarks.html and place it in your home directory dont-confirm quit close overwrite home http://www.gbarl.it/lofiversion/index.php jumps google www.google.it dslinux www.dslinux.org help local:/usr/local/doc/retawq/index.html # Then create the help file index.html and place it in /usr/local/doc/retawq/ keymap command ctrl-n document-search-next #assign a keyboard command to 'find next' ctrl-p document-search-previous #assign a keyboard command to 'find previous' ctrl-a document-top #since we don't have a home key, reassign keyboard command for home ctrl-e document-bottom #since we don't have an end key, reassign keyboard command for end ctrl-r form-reset #assign keyboard command to reset html form ctrl-s form-submit #assign keyboard command to submit html form search-engine www.google.com # http-cookies http-cookies allow * # permetti tutti i cookie salvate il tutto con CTR-x dopo date y(yes) ed invio. Avrete ora il vostro config creato lanciate ora il vostro browser e il gioco è fatto, con h andrete sempre in home page mentre con il comando j (jump alias salti) andrete a pagine predefinite più usate. Comandi Linux Console virtuali [ALT]-[Fn] ci permette di selezionare console virtuali nel caso una si sia bloccata o vogliamo mandare in esecuzioni più porgrammi (vedi sotto) Il comando PS Viene utilizzato per conoscere i processi attivi nei sistemi uni* Linux nei sistemi windows si usa il task-manager. Dopo aver visto il PID del nostro processo useremo il comando kill per terminare questo proecesso. PID Uid VmSize Stat Command 17 root SW -sh 28 root RW ps Il comando KILL Con tale comando noi teminiamo un processo in esecuzione, da usare con molta cautela nel caso non sappiate cosa state facendo kill -9 (nr°di pid interessato) Buona navigazione. Dengue Autore: jewelie Sito: www.scdev.org Forum: http://scdev.org/forum/viewtopic.php?t=7126 Foto: pitux Traduzione libera: dengue -------------------- Metroide Prime demo - Super Mario DS - Mario Kart DS - WarioWare Touched
  Nintendo DS Silver , Nintendo DS Pink , Nintendo GameBoy Advance Sp Blue Nintendo 64, Nindendo Wii, Playstation, Playstation 2, Playstation portable, Xbox 360 |
  |
 
|


 |
Risposte
|
Wednesday 22 November 2006 - 23:11
Messaggio
#2
|
|
 Utente GBARL Gruppo: Membri Messaggi: 66 Iscritto il: Tue 18 July 2006 - 14:00 Da: Firenze Utente Nr.: 12.356 Feedback: 4 (100%) |
eppure a me non riesce di fare collegare il ds al router...in dhcp seguendo le ifo di dslinux.org non riesco a entrare e ricevo un errore su un certo default.script nella cartella udchpc mentre in static proprio non ne vuole sapere...Consigli?Ah,dimenticavo,ho dovuto sostituire il file network con una ltro trovato sul forum di dslinux perchè non mi funzionava.Questo parte ma mi dà non so quante righe con scritto "not found"....
--------------------  " Me lo sono costruito e adesso me lo godo !" |
|
|
|
|
Wednesday 22 November 2006 - 23:55
Messaggio
#3
|
|
|
Boss GBA/NDS Gruppo: Membri Messaggi: 316 Iscritto il: Mon 20 September 2004 - 21:17 Utente Nr.: 1.880 Feedback: 0 (0%) |
CITAZIONE (zwinglio @ Wednesday 22 November 2006 - 23:11)  eppure a me non riesce di fare collegare il ds al router...in dhcp seguendo le ifo di dslinux.org non riesco a entrare e ricevo un errore su un certo default.script nella cartella udchpc mentre in static proprio non ne vuole sapere...Consigli?Ah,dimenticavo,ho dovuto sostituire il file network con una ltro trovato sul forum di dslinux perche non mi funzionava.Questo parte ma mi d`a non so quante righe con scritto "not found".... ciao! anch'io in effeti ho "problemi" di DHCP con dslinux.... cioe non sono problemi perche vado tranquillamente a IP fisso... pero e strano, il DHCP mi va bene con gli homebrew (ndsmail ) e con la WFC.... il fatto e che ho iniziato a usare dslinux prima della WFC, vado bene, non mi preoccupo... il DHCP in se va, ma non trova i DNS; cos`i riuscivo a pingare gli IP numerici, ma non le URL istruzioni buone per me (a memoria, ora sono sul pc del vicino): EDIT: post corretto durante una `seduta`, col ds e links -sull' AP escludi dal DHCP un indirizzo, x il ds (io p. es. ho riservato a DHCP a partire da 192.168.2.101, il DS user`a 192.168.2.100) -copia /etc/rc.default in /etc/rc.conf (non e necessaria la path che c'e sul file stesso, c'e un link) (btw, che card hai e che build usi? i file di conf sono in /etc, che sul build RAM e montata anche come /media/linux/etc ) -edita il file (con vi se sei un linuxiano, con nano se no) lascia bianco wfc_conf='' essid='nomerete' channel='11' # metti il tuo numero, a me funziona anche in bianco/auto wepkey='nonteladico' ip='192.168.2.100' #(coerente con quanto sopra per l'AP gateway='192.168.2.1' #IP privato del tuo AP netmask se serve (forse no) broadcast io lascio in bianco Poi ci sono i DNS: ioli configuro qui, ma anche come dico dopo; meglio essere abbondanti che deficienti dns1='metti quelli del tuo provider libero, fastweb, tiscali, alice) dns2='come sopra' abilita la rete al boot -quanto sopra dovrebbe bastare; io pero ho anche un file col DNS, che mi serviva quando avviavo la rete a mano dopo; non fa male ; il file si chiama /etc/resolv.conf ciao, buona navigaz -------------------- GBA Transparent + AfterBurner, GBA SP Silver (JAP)
NDS RED (Singapore), NDS Silver FW v7 stealth FlashAdvance Pro 64 e 128, Flash2Advance 128, GameWallet, GB Bridge |
|
|
|
Inserisci in questo messaggio
 dengue [GUIDA] DSLinux su supercard FAQ Wednesday 8 November 2006 - 19:37
 dengue nella prossima revisone inserisco le immagini per ... Wednesday 8 November 2006 - 19:45 gorzy Per m3 il procedimento è lo stesso? Wednesday 8 November 2006 - 20:57
 dengue CITAZIONE (gorzy @ Wednesday 8 November 2006 ... Wednesday 8 November 2006 - 21:47 koda GRAZIEEEE
ci voleva proprio una bella guida per... Wednesday 8 November 2006 - 22:36 gorzy Scusa se lo chiedo...ma a cosa serve specificatame... Wednesday 8 November 2006 - 22:45 dengue fai girare linux e puoi navigare in intenet (in mo... Wednesday 8 November 2006 - 23:10 xaos E per quanto riguarda il creare semplici programmi... Thursday 9 November 2006 - 21:08 dengue In questo link spiega come creare semplici applica... Thursday 9 November 2006 - 21:30 gorzy Ho settato tutto seguendo la tua ottima guida..ma ... Thursday 9 November 2006 - 23:50 aletorchic CITAZIONE (dengue @ Wednesday 8 November 2006... Thursday 9 November 2006 - 23:55 dengue @aletorchic
Verissimo quanto detto li ho menziona... Friday 10 November 2006 - 00:03 gorzy Grandissimo dengue!!! Va alla grande... Friday 10 November 2006 - 00:11 xaos CITAZIONE (dengue @ Thursday 9 November 2006 ... Friday 10 November 2006 - 03:41 Aurelio Grazie Friday 10 November 2006 - 08:53 dengue non puoi compilare un sorgente dal DS devi avere u... Friday 10 November 2006 - 09:22 xaos Grazie e' quello che volevo sapere Friday 10 November 2006 - 12:16 koda CITAZIONE (dengue @ Friday 10 November 2006 ... Friday 10 November 2006 - 13:31 aletorchic CITAZIONE (koda @ Friday 10 November 2006 ... Saturday 11 November 2006 - 09:37 smurf Scusa la domanda (che faccio prima di provare dsli... Friday 10 November 2006 - 18:29 dengue links e retawq sono già installati la password di ... Friday 10 November 2006 - 18:38 Aurelio Scusate ma un linux che occupa sui 100-200 MB esis... Saturday 11 November 2006 - 10:00 koda CITAZIONE (Aurelio @ Saturday 11 November 200... Saturday 11 November 2006 - 12:28 dengue Io consiglio anche Slax molto facile da scaricare ... Saturday 11 November 2006 - 13:29 Dae Salve raga, ho intenzione di provare linux su ds l... Saturday 11 November 2006 - 14:01 dengue Si funziona si NDSlite +supercard
cancelli la dir... Saturday 11 November 2006 - 14:04 Dae Grazie ! ah 1 altra cosa, è gia disponibile un... Saturday 11 November 2006 - 14:15 dengue no per adesso solo testo qualcosa gira su nano-X m... Saturday 11 November 2006 - 14:17 Aurelio @koga e a dengue
grazie Saturday 11 November 2006 - 14:25 phoenix530 scusate tanto, ma si puo' installare dslinux s... Saturday 11 November 2006 - 18:44 dengue per ora sembra di no... in futuro forse. Saturday 11 November 2006 - 18:52 phoenix530 azz nn la sapevo questa....
mi sa ke allora annul... Saturday 11 November 2006 - 19:01 koda CITAZIONE (Aurelio @ Saturday 11 November 200... Sunday 12 November 2006 - 02:05 phoenix530 no vabbe' ormai per andare sul sicuro, ho mand... Sunday 12 November 2006 - 13:22 dengue Anche senza interfaccia grafica il poter navigare ... Sunday 12 November 2006 - 13:54 dengue Questo vuole essere una prova di invio msg con lin... Tuesday 14 November 2006 - 08:35 aletorchic CITAZIONE (dengue @ Tuesday 14 November 2006 ... Tuesday 14 November 2006 - 08:56 dengue Piccolo trucco per navigare più velocemente e con ... Tuesday 14 November 2006 - 09:00 [?]Joker[?] Complimenti dengue per la guida...arrivata ieri la... Tuesday 14 November 2006 - 09:41 dengue Aggiunto comandi Retawq, spiegazione dei comandi p... Wednesday 15 November 2006 - 13:41 smurf Ho provato ora dslinux su sclite (fw 1.70) ma non ... Wednesday 15 November 2006 - 20:09 dengue hai inserito nel ds una directory con nome linux e... Wednesday 15 November 2006 - 20:15 smurf CITAZIONE (dengue @ Wednesday 15 November 200... Thursday 16 November 2006 - 11:53 aletorchic CITAZIONE Ho provato ora dslinux su sclite (fw 1.7... Thursday 16 November 2006 - 12:14 dengue stessa domanda quale editor hai usato ?? sotto win... Thursday 16 November 2006 - 18:06 smurf Sotto dslinux con l'editor segnalato nella gui... Thursday 16 November 2006 - 18:52 dengue si sotto ubuntu puoi farlo tranquillamente Thursday 16 November 2006 - 19:35 smurf Allora appena posso provo e poi vi faccio sapere Thursday 16 November 2006 - 21:05 dengue Aggiunto configurazione di retawq (config file) or... Saturday 18 November 2006 - 12:04 gorzy Propongo di mettere questo thred negli importanti.... Saturday 18 November 2006 - 21:19 phoenix530 scusate, ma e' normale ke si veda il testo nel... Saturday 18 November 2006 - 22:02 gorzy Non penso... Sunday 19 November 2006 - 18:44 aletorchic CITAZIONE (gorzy @ Sunday 19 November 2006 ... Sunday 19 November 2006 - 20:12 gorzy Ah non lo sapevo... Monday 20 November 2006 - 15:20 dengue in questi giorni inserisco ulteriori info su Links... Tuesday 21 November 2006 - 21:18 phoenix530 no aspettate mi spegate passo passo come metterlo ... Tuesday 21 November 2006 - 22:14 aletorchic CITAZIONE (phoenix530 @ Tuesday 21 November 2... Tuesday 21 November 2006 - 22:20 phoenix530 spe ma ricompilarlo sul ds??
na mini guida se puo... Tuesday 21 November 2006 - 23:32 aletorchic CITAZIONE (phoenix530 @ Tuesday 21 November 2... Tuesday 21 November 2006 - 23:43 phoenix530 intendevo in italiano XD Wednesday 22 November 2006 - 16:51 dengue Marca e modello per info ?
grazie Wednesday 22 November 2006 - 23:27 zwinglio ciao,grazie per essere intervenuti.Ho una m3 lite ... Thursday 23 November 2006 - 09:25 aletorchic CITAZIONE (zwinglio @ Thursday 23 November 20... Friday 24 November 2006 - 00:31 zwinglio è la vera M3 lite...digitando "free" sul... Friday 24 November 2006 - 01:14 zwinglio Ogni volta che cerco di connetermi sia in modo sta... Friday 24 November 2006 - 01:15 aletorchic CITAZIONE (zwinglio @ Friday 24 November 2006... Friday 24 November 2006 - 01:31 aletorchic zwinglio,
vedo su dslinux che hai risolto il probl... Saturday 25 November 2006 - 00:43 dengue Buone nuove per tutti il grande GPF ha riscritto i... Saturday 25 November 2006 - 11:50 aletorchic CITAZIONE (dengue @ Saturday 25 November 2006... Saturday 25 November 2006 - 16:26 gorzy Figoooooo...ma come si fa a scaricarlo o utilizzar... Saturday 25 November 2006 - 12:09 dengue test effettuato da GPF da rivedere qualcosa per mi... Saturday 25 November 2006 - 12:19 zwinglio scusate scusate..eccomi qua...
Allora,c'è un f... Saturday 25 November 2006 - 15:25 aletorchic CITAZIONE (zwinglio @ Saturday 25 November 20... Saturday 25 November 2006 - 17:05 dengue Link per windows in ambiente testuale per testare ... Sunday 26 November 2006 - 21:37 koda Ciao ragazzi!
con non poche difficolra`
... Tuesday 28 November 2006 - 14:40 spillo ciao ragazzi, ho seguito per un po questo 3d....po... Friday 1 December 2006 - 15:43 aletorchic CITAZIONE (spillo @ Friday 1 December 2006 ... Friday 1 December 2006 - 16:07 spillo CITAZIONE (aletorchic @ Friday 1 December 200... Friday 1 December 2006 - 16:14 aletorchic CITAZIONE (spillo @ Friday 1 December 2006 ... Friday 1 December 2006 - 16:39 Nemo_DS Yukyuk, ci siam dimenticati di spostare questo thr... Friday 1 December 2006 - 16:19 koda @spillo: in pratica avrai solo una "versione ... Friday 1 December 2006 - 18:40 tony8970 raga a me kiede all'inizio nome utente e pass ... Thursday 21 December 2006 - 17:24 aletorchic CITAZIONE (tony8970 @ Thursday 21 December 20... Thursday 21 December 2006 - 19:05 dengue root/uClinux rispettivamente login/password usa il... Thursday 21 December 2006 - 18:04 gorzy Ma alla fine è stata rilasciata la versione nuova ... Thursday 21 December 2006 - 18:35 dengue non ancora Thursday 21 December 2006 - 18:36 angelus_k hem....... salve raga^^ scusate il disturbo ma av... Friday 22 December 2006 - 11:04 dengue per fare questo basta guardare il post prima del t... Friday 22 December 2006 - 18:10 beatles ciao a tutti.
come da firma ho supercard, superkey... Saturday 6 January 2007 - 00:26 Gogeta Su supercard ds one non si può usare vero? Ottengo... Wednesday 10 January 2007 - 18:38 M.Z Complimenti dengue, bellissima guida!
Anche se... Friday 12 January 2007 - 08:53 DS_PSP anke a me con supercard ds one nn và
soluzioni? Saturday 13 January 2007 - 15:53 CDB_Emerald Ma posso utilizzarlo anche io che ho una card da s... Saturday 20 January 2007 - 17:46 gorzy Si sono previsti, però purtroppo solo per flashcar... Saturday 20 January 2007 - 18:40 Max_Axe vi prego non c'è modo di farlo partire su Supe... Tuesday 23 January 2007 - 18:46 gorzy Si, ma senza ram...quindi niente link grafico.... Wednesday 24 January 2007 - 19:16 HappyCriminal CITAZIONE (gorzy @ Wednesday 24 January 2007 ... Tuesday 6 February 2007 - 21:51 gorzy Non saprei...bisogna vedere se sono compatibili... Tuesday 6 February 2007 - 23:13
dengue CITAZIONE (gorzy @ Wednesday 8 November 2006 ... Wednesday 8 November 2006 - 21:47 koda GRAZIEEEE
ci voleva proprio una bella guida per... Wednesday 8 November 2006 - 22:36 gorzy Scusa se lo chiedo...ma a cosa serve specificatame... Wednesday 8 November 2006 - 22:45 dengue fai girare linux e puoi navigare in intenet (in mo... Wednesday 8 November 2006 - 23:10 xaos E per quanto riguarda il creare semplici programmi... Thursday 9 November 2006 - 21:08 dengue In questo link spiega come creare semplici applica... Thursday 9 November 2006 - 21:30 gorzy Ho settato tutto seguendo la tua ottima guida..ma ... Thursday 9 November 2006 - 23:50 aletorchic CITAZIONE (dengue @ Wednesday 8 November 2006... Thursday 9 November 2006 - 23:55 dengue @aletorchic
Verissimo quanto detto li ho menziona... Friday 10 November 2006 - 00:03 gorzy Grandissimo dengue!!! Va alla grande... Friday 10 November 2006 - 00:11 xaos CITAZIONE (dengue @ Thursday 9 November 2006 ... Friday 10 November 2006 - 03:41 Aurelio Grazie Friday 10 November 2006 - 08:53 dengue non puoi compilare un sorgente dal DS devi avere u... Friday 10 November 2006 - 09:22 xaos Grazie e' quello che volevo sapere Friday 10 November 2006 - 12:16 koda CITAZIONE (dengue @ Friday 10 November 2006 ... Friday 10 November 2006 - 13:31 aletorchic CITAZIONE (koda @ Friday 10 November 2006 ... Saturday 11 November 2006 - 09:37 smurf Scusa la domanda (che faccio prima di provare dsli... Friday 10 November 2006 - 18:29 dengue links e retawq sono già installati la password di ... Friday 10 November 2006 - 18:38 Aurelio Scusate ma un linux che occupa sui 100-200 MB esis... Saturday 11 November 2006 - 10:00 koda CITAZIONE (Aurelio @ Saturday 11 November 200... Saturday 11 November 2006 - 12:28 dengue Io consiglio anche Slax molto facile da scaricare ... Saturday 11 November 2006 - 13:29 Dae Salve raga, ho intenzione di provare linux su ds l... Saturday 11 November 2006 - 14:01 dengue Si funziona si NDSlite +supercard
cancelli la dir... Saturday 11 November 2006 - 14:04 Dae Grazie ! ah 1 altra cosa, è gia disponibile un... Saturday 11 November 2006 - 14:15 dengue no per adesso solo testo qualcosa gira su nano-X m... Saturday 11 November 2006 - 14:17 Aurelio @koga e a dengue
grazie Saturday 11 November 2006 - 14:25 phoenix530 scusate tanto, ma si puo' installare dslinux s... Saturday 11 November 2006 - 18:44 dengue per ora sembra di no... in futuro forse. Saturday 11 November 2006 - 18:52 phoenix530 azz nn la sapevo questa....
mi sa ke allora annul... Saturday 11 November 2006 - 19:01 koda CITAZIONE (Aurelio @ Saturday 11 November 200... Sunday 12 November 2006 - 02:05 phoenix530 no vabbe' ormai per andare sul sicuro, ho mand... Sunday 12 November 2006 - 13:22 dengue Anche senza interfaccia grafica il poter navigare ... Sunday 12 November 2006 - 13:54 dengue Questo vuole essere una prova di invio msg con lin... Tuesday 14 November 2006 - 08:35 aletorchic CITAZIONE (dengue @ Tuesday 14 November 2006 ... Tuesday 14 November 2006 - 08:56 dengue Piccolo trucco per navigare più velocemente e con ... Tuesday 14 November 2006 - 09:00 [?]Joker[?] Complimenti dengue per la guida...arrivata ieri la... Tuesday 14 November 2006 - 09:41 dengue Aggiunto comandi Retawq, spiegazione dei comandi p... Wednesday 15 November 2006 - 13:41 smurf Ho provato ora dslinux su sclite (fw 1.70) ma non ... Wednesday 15 November 2006 - 20:09 dengue hai inserito nel ds una directory con nome linux e... Wednesday 15 November 2006 - 20:15 smurf CITAZIONE (dengue @ Wednesday 15 November 200... Thursday 16 November 2006 - 11:53 aletorchic CITAZIONE Ho provato ora dslinux su sclite (fw 1.7... Thursday 16 November 2006 - 12:14 dengue stessa domanda quale editor hai usato ?? sotto win... Thursday 16 November 2006 - 18:06 smurf Sotto dslinux con l'editor segnalato nella gui... Thursday 16 November 2006 - 18:52 dengue si sotto ubuntu puoi farlo tranquillamente Thursday 16 November 2006 - 19:35 smurf Allora appena posso provo e poi vi faccio sapere Thursday 16 November 2006 - 21:05 dengue Aggiunto configurazione di retawq (config file) or... Saturday 18 November 2006 - 12:04 gorzy Propongo di mettere questo thred negli importanti.... Saturday 18 November 2006 - 21:19 phoenix530 scusate, ma e' normale ke si veda il testo nel... Saturday 18 November 2006 - 22:02 gorzy Non penso... Sunday 19 November 2006 - 18:44 aletorchic CITAZIONE (gorzy @ Sunday 19 November 2006 ... Sunday 19 November 2006 - 20:12 gorzy Ah non lo sapevo... Monday 20 November 2006 - 15:20 dengue in questi giorni inserisco ulteriori info su Links... Tuesday 21 November 2006 - 21:18 phoenix530 no aspettate mi spegate passo passo come metterlo ... Tuesday 21 November 2006 - 22:14 aletorchic CITAZIONE (phoenix530 @ Tuesday 21 November 2... Tuesday 21 November 2006 - 22:20 phoenix530 spe ma ricompilarlo sul ds??
na mini guida se puo... Tuesday 21 November 2006 - 23:32 aletorchic CITAZIONE (phoenix530 @ Tuesday 21 November 2... Tuesday 21 November 2006 - 23:43 phoenix530 intendevo in italiano XD Wednesday 22 November 2006 - 16:51 dengue Marca e modello per info ?
grazie Wednesday 22 November 2006 - 23:27 zwinglio ciao,grazie per essere intervenuti.Ho una m3 lite ... Thursday 23 November 2006 - 09:25 aletorchic CITAZIONE (zwinglio @ Thursday 23 November 20... Friday 24 November 2006 - 00:31 zwinglio è la vera M3 lite...digitando "free" sul... Friday 24 November 2006 - 01:14 zwinglio Ogni volta che cerco di connetermi sia in modo sta... Friday 24 November 2006 - 01:15 aletorchic CITAZIONE (zwinglio @ Friday 24 November 2006... Friday 24 November 2006 - 01:31 aletorchic zwinglio,
vedo su dslinux che hai risolto il probl... Saturday 25 November 2006 - 00:43 dengue Buone nuove per tutti il grande GPF ha riscritto i... Saturday 25 November 2006 - 11:50 aletorchic CITAZIONE (dengue @ Saturday 25 November 2006... Saturday 25 November 2006 - 16:26 gorzy Figoooooo...ma come si fa a scaricarlo o utilizzar... Saturday 25 November 2006 - 12:09 dengue test effettuato da GPF da rivedere qualcosa per mi... Saturday 25 November 2006 - 12:19 zwinglio scusate scusate..eccomi qua...
Allora,c'è un f... Saturday 25 November 2006 - 15:25 aletorchic CITAZIONE (zwinglio @ Saturday 25 November 20... Saturday 25 November 2006 - 17:05 dengue Link per windows in ambiente testuale per testare ... Sunday 26 November 2006 - 21:37 koda Ciao ragazzi!
con non poche difficolra`
... Tuesday 28 November 2006 - 14:40 spillo ciao ragazzi, ho seguito per un po questo 3d....po... Friday 1 December 2006 - 15:43 aletorchic CITAZIONE (spillo @ Friday 1 December 2006 ... Friday 1 December 2006 - 16:07 spillo CITAZIONE (aletorchic @ Friday 1 December 200... Friday 1 December 2006 - 16:14 aletorchic CITAZIONE (spillo @ Friday 1 December 2006 ... Friday 1 December 2006 - 16:39 Nemo_DS Yukyuk, ci siam dimenticati di spostare questo thr... Friday 1 December 2006 - 16:19 koda @spillo: in pratica avrai solo una "versione ... Friday 1 December 2006 - 18:40 tony8970 raga a me kiede all'inizio nome utente e pass ... Thursday 21 December 2006 - 17:24 aletorchic CITAZIONE (tony8970 @ Thursday 21 December 20... Thursday 21 December 2006 - 19:05 dengue root/uClinux rispettivamente login/password usa il... Thursday 21 December 2006 - 18:04 gorzy Ma alla fine è stata rilasciata la versione nuova ... Thursday 21 December 2006 - 18:35 dengue non ancora Thursday 21 December 2006 - 18:36 angelus_k hem....... salve raga^^ scusate il disturbo ma av... Friday 22 December 2006 - 11:04 dengue per fare questo basta guardare il post prima del t... Friday 22 December 2006 - 18:10 beatles ciao a tutti.
come da firma ho supercard, superkey... Saturday 6 January 2007 - 00:26 Gogeta Su supercard ds one non si può usare vero? Ottengo... Wednesday 10 January 2007 - 18:38 M.Z Complimenti dengue, bellissima guida!
Anche se... Friday 12 January 2007 - 08:53 DS_PSP anke a me con supercard ds one nn và
soluzioni? Saturday 13 January 2007 - 15:53 CDB_Emerald Ma posso utilizzarlo anche io che ho una card da s... Saturday 20 January 2007 - 17:46 gorzy Si sono previsti, però purtroppo solo per flashcar... Saturday 20 January 2007 - 18:40 Max_Axe vi prego non c'è modo di farlo partire su Supe... Tuesday 23 January 2007 - 18:46 gorzy Si, ma senza ram...quindi niente link grafico.... Wednesday 24 January 2007 - 19:16 HappyCriminal CITAZIONE (gorzy @ Wednesday 24 January 2007 ... Tuesday 6 February 2007 - 21:51 gorzy Non saprei...bisogna vedere se sono compatibili... Tuesday 6 February 2007 - 23:13 |
1 utenti stanno leggendo questa discussione (1 visitatori e 0 utenti anonimi)
0 utenti:

|
Versione Lo-Fi | Oggi è il: Thu 19 June 2025- 08:31 |
